OVERVIEW
Note: Throughout this user-guide, blue images like the ones below are clickable and will bring up a video. Alternatively, you can find the individual videos in user guide/video_user_guide/
 |
 |
This user guide consists of an overview video (above), that you should definitely watch. There's loads of useful information about installing and applying the presets, as well as working with 3D raytraced text in After Effects CS6 and above. In the "Presets" section (left), you'll find a short video guide for each of the individual presets.
_________________________________________________________________________________________________________________________________________________________________________
To Install
Simply drag the Felt Tips - Cartoon Text Presets V3 folder to the Presets folder of your After Effects installation. You can find the Presets folder in the same directory as your After Effects install. If you wish to install the materials presets (to quickly get the look of the preview file) you should also drag the folder Felt-Tips - Cartoon Text Material and Geometry Presets into the Presets folder. You'll find this in the Extras folder of your download.
While you're at it, if you're using After Effects CC 2014, you can install the script Felt_Tips - Speedy Expressions Cache v4.jsxbin. This script sets a preference in After Effects so that it uses a faster method of caching expressions. To install, copy this file from Extras/Speedy Expressions Script (CC 2014+) into Scripts/Script UI Panels
Once this is done, restart After Effects. The presets will now be available in the Effects and Presets window in After Effects. (if you can't see it, you can find it under the Window menu). And if you installed the script, it will be available under the Window menu.
_________________________________________________________________________________________________________________________________________________________________________
Applying effects
Where to find the effects in Ae
Apply effects from the Effects and Presets window. You can find them by typing in "felt" in the search field. Although you can apply the presets from Adobe Bridge, it's not advisable.
Applying the presets
When you apply the presets, the animation will start at the point under the playback head. So for best results, line the playback head up where you want the animation to start.
Applying to 2D layers
When you apply these effects, even to a 2D layer, the layer will become 3D (with per-character 3D enabled). This is to preserve the 3D traits that are embedded in the presets. If you want the text to be 2D, then simply change it to 2D after you have applied the preset. At this point, any references to 3D properties will be removed (in other words, you can't change it back to 3D afterwards!).
How to Adjust
You adjust the presets by adjusting the effect sliders on the layer. These effects all start with the name of the preset, so you know which they are. To see all effects on a layer, select the layer and press E on your keyboard.
Working Effects
Effects that have an X in their name- for instance, Elastic-Out - X Amount or X Elastic-Out - Amount - are working effects, used internally by the presets. They're not designed to be adjusted. These internal effects appear below a dotted line in the effects stack.
Renaming Effects
This is a little bug in After Effects that doesn't update expressions on text selectors when effect names are changed. So.... don't change the names of the effects!
Applying presets from the projects
If you want to, you can also open up or import the projects and just adapt the text layers with the presets already applied.
Synchronised Randoms
All of these presets are designed so that the movements are synchronised - even where the movement is randomized. That means you can duplicate layers and they will move completely in lock-step with one another. And that means that you can work with compound text - text that is made out of more than one text layer such as in the preview (see the How to get that look user guide below)
_________________________________________________________________________________________________________________________________________________________________________
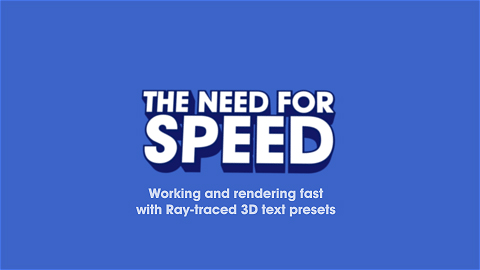
Speed - How to work fast and clever with Ray-traced 3D in CS6 and above.
Ray-traced 3D in After Effects doesn't work like the standard After Effects compositor. It's more akin to a 3D program than the classic 2D / 2.5D After Effects that we know and love. The way that layers interact with one another in Ray-traced 3D comps is somewhat different, but the main and most noticeable difference is that ray-traced comps seem to work much more slowly. This is due to the computational intensity of rendering true 3D depth with ray-tracing.
This doesn't mean that you have to work and render slowly though; all it means is that you have to be a bit more careful about how you use After Effects and working with ray-traced 3D needn't be a painful experience.
As regards these text presets, it's hard to give a guideline for how quickly they should render, since there are so many factors that effect the rendering time of ray-traced 3D. Factors like the set-up and complexity of your composition; the number of lights, the size and the length of your text, the Ray-tracing Quality setting, whether you're using CS6 or CC, whether you're rendering with motion blur on, the speed of your computer and graphics card.... the list goes on.
As a rough guideline for these text presets: For shorter pieces of text (up to 20 characters long) on a single layer using a similar set-up to the preview video, you should be able to work close to real-time and render at around 10 seconds per frame or less (HD with Ray-tracing Quality : 5 or 6). CS6 with motion blur on may take somewhat longer. If you've followed the tips below and you're getting nowhere near those values, drop me a line ben@felt-tips.net.
Below are some guidelines for working fast.
General
Switch on the expressions MoreCache preference.
If you're using After Effects CC 2014, there is a new preference that changes the way that expressions are cached. At the moment, it's not the default setting (I believe the After Effects team are seeing how it goes before making it the default). But it is very effective at speeding up the rendering of projects that use expressions (such as these text presets). The speed increase can be as much as a factor of 5 or 6 times faster, particularly where After Effects native motion blur is being used.
You can easily switch this preference on and off using the script included in the download (in Extras/Speedy Expressions Script (CC 2014+)). There are instructions for installing the script above. Each time you change the preference, you'll need to restart After Effects before the change takes effect.
I have the setting turned on full time now. But since it's not a fully sanctioned After Effects default setting at the moment, I'll add this little disclaimer: make sure to save your project and backup your work before you set off a render (but that goes without saying anyway!).
Working / Previewing
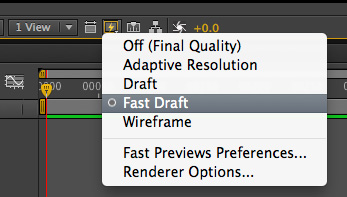
Fast Draft
When working in Ray-traced 3D, make sure that you are in Fast-Draft mode. This setting is specifically designed for working and previewing. If you want to see how your final lighting will look in all its glory, switch over to Final Quality and let one frame render, then switch back to Fast-Draft. When you render you comp with Best Settings, After Effects will use Final Quality mode. You can change your previewing mode by using the little switch on the bottom right of the preview window with a little lightning bolt on it (below)
Motion Blur
When working in Ray-traced 3D, make sure that the motion blur switch is turned off for the composition. If motion blur is on, expressions may be evaluated for each motion blur iteration (regardless of whether Fast-Draft is on or not). This will make preview times much longer and will stop you being able to scrub through the animations and see a responsive update. If you do want to see a preview with motion blur, go into the Rendering Options, set the composition's Ray-tracing Quality to 3 and switch temporarily to Final Quality. This will give you 9 iterations of motion blur, which isn't the prettiest, but it's plenty to give you a feel for how the animation will be with motion blur on. Remember to put the Ray-tracing Quality to 5 or 6 before you render.

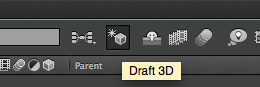
Draft 3D
When working in Ray-traced 3D, it's also a good idea to have the draft-3D switch on for the composition. Draft 3D turns off all lighting and shading on the text and runs much faster.
Wireframe
Sure... it's old school - but if you're just wanting to quickly preview the movement of your text, switch to Wireframe mode (you'll find it in the same place as Fast Draft). If you hit the space bar, it generally plays at close to real-time.
Length of Text
Text presets are essentially 3D particle systems, and the longer your text is, the more particles there are that After Effects has to work out the position of... and of course if motion blur is on, the position has to be worked out for each iteration of motion blur too. If you have 100 characters of text, and you're using a Ray-tracing Quality of 10 (100 iterations of motion blur), then each expression will need to be executed 100x100 = 10,000 times. If you are using 10 characters of text with a Ray-tracing Quality of 5 (25 iterations of motion blur), then each expression will need to be executed 10*25 times. The first example will render 40 times slower! Bear this in mind when you're planning your project. Perhaps there's a clever way you can split your text to get a better speed.
Size of Text
The bigger your text is on screen, the longer After Effects will need to render it. This is nothing to do with the presets, but because of the simple fact that if your text is bigger on screen, there are more pixels that After Effects needs to render as Ray-traced 3D pixels.
Translucency
When text elements are translucent, they tend to render more slowly. Bear it in mind when those first frames are taking longer to render than expected.
Number of lights
When working in Ray-traced 3D, try to restrict yourself to a smaller number of lights. Ideally, less than 10. A good number is 5. Think also about having a single light that you use while you're working (turning the main lighting rig off). This will give your 3D some shading and depth while keeping previewing times to a minimum. Remember to turn the full lighting rig back on before you render.
Other
There are many things in After Effects that push Ray-traced 3D rendering off the scale: soft reflections, camera depth of field, large environment maps, very high Ray-tracing Quality setting etc. Bear these things in mind when setting up your comps.
Test
Try a little test render every now and then to make sure your composition is not getting too render heavy. It need only be 10 frames or so, but it can avoid nasty surprises at the end of a job.
Rendering
Ray-tracing Quality
For an HD comp, I usually find that a Ray-tracing Quality of 5 or 6 gives an optimal balance between image quality and render time. This will give 25 and 36 iterations of motion blur respectively.
Render to an image sequence
Render to an image sequence, not a video file. If you do this, you can stop a render at any time, alter the settings and pick up again where you left off. If you render directly to a video file, any rendering you have done before you stop the render may have been wasted. Once the sequence is complete, import it into After Effects, add the sound and render it through as a movie file in just a couple of minutes.
In CS6, use CC Force Motion Blur or Pixel Motion Blur instead of native motion blur
Unfortunately, in CS6, the expressions MoreCache preference isn't available, and that can make rendering with native motion blur a bit painful. There are ways round this though, which I go into in the second half of the tutorial below. One method is to precompose the 3D text layer, copy all the lights from the main comp into the new comp, turn motion blur off for all layers and the comp. Back in the main comp, you can now add a CC Force Motion Blur Effect This looks just as good and will render faster. Between 8 and 16 Iterations should suffice to give you a nice smooth motion blur. Another option is to use the new Pixel Motion Blur (available as of After Effects CC).
Miscellaneous
Text that begins with a space
There's a little bug in After Effects that on certain occasions, when text begins with a space the whole text disappears. There's no known workaround for this at the moment, so best to not start your text with a space!
 |
 |
_________________________________________________________________________________________________________________________________________________________________________
The preview video (bonus file) - how to get that look!
The presets that constitute this download are text animation presets. They are designed to be applied to your own style of text within your own design and lighting set-up, and quite deliberately do not set the color and look of the text. However, some users want to get exactly the same look as the preview file. That's a little more complex, because it's the result of many different factors - the geometry, material, positioning and color of the text, the lighting set-up and the render settings. It's actually not possible to put all of these things into a preset. But, to help you achieve the look of the preview video quickly (should you want it) I've included several material and geometry presets that you can drag and drop to give your text the look of the preview file.Material and Geometry Presets
These can be found in the Extras folder, should be installed in the same way as the main presets (see above) and then applied by dragging and dropping in the same way as the main presets. Note that you should apply these presets to 3D text layers containing text that is 100 pixels in size (the size set in the Character palette - adjust the size on screen using the layer's Scale property) and for best results, applied after you've applied the main text animation preset.
There's a full video user guide (above) that shows you how to use these.
Preview Lighting Set Up
Of course, simply applying the color and material to the text is only half of the story. If you want the complete look, you're also going to have to apply exactly the same illumination to the scene. To that end, I've also included an After Effects project containing the lighting rig from the preview file. You find this file in Extras. The project contains the full lighting set-up and a simplified lighting set-up. In 99% of instances, I'd use the simplified version. It achieves an almost identical look with far fewer lights - and that means much less rendering time. Whichever lighting rig you apply, it's designed to illuminate objects that are positioned in the middle of the comp at a z-depth of 0. i.e. [960,540,0] in a full HD comp.
Full instructions about how to apply this are in the tutorial video (above).
Reflection Map
The Lighting Rig project links to an external file called Reflection_Map.jpg. As the name suggests, this is an image of the environment that the text reflects. Note that if you use the lighting rig, it includes this reflection map, so be careful if you're copying your project to another location to also move this file. You'll find it in Extras/Reflection Map.
The full preview project
The full After Effects project file for the preview is also included. It's a bonus file included for the sake of reference and hence has no user guide (since this download is a set of presets, including a full After Effects project with user guide would put the price up significantly... and we don't want that!). The original project was a CS6 project, but I've also included a stripped down CS5 version that doesn't use Ray-traced 3D (only available in CS6 and above).
So use this file if you wish as a basis for your own presentation. Drop me a line if you have any questions. ben@felt-tips.net